Video Call
Preparations
Before each video call, the system automatically checks whether the necessary requirements for a functioning conversation are met. This includes whether the microphone is accessible and whether the user has correctly adjusted the microphone settings. The system provides the user with appropriate assistance at all points where interaction is required and displays the appropriate information.
In a first step, the user is asked whether he is active on the upcoming video call, i.e. would like to participate by voice or in a passive, only listening form.

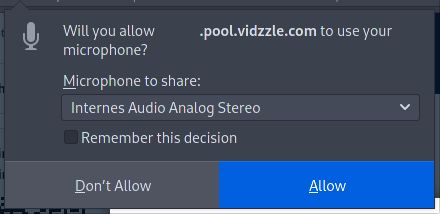
Should the user opt for passive participation, he will be directed to the video call without further questions and can listen to it. If participation is active, the system next checks whether it has access to the microphone. To do this, the browser displays a message (this may look slightly different from browser to browser) and requests the appropriate authorization from the user.
In a final step, the user is connected to a so-called echo test to check whether the microphone is working correctly. There the user hears everything he says through his loudspeakers. If the user does not hear himself, something is wrong with his settings and the video call is likely to fail.
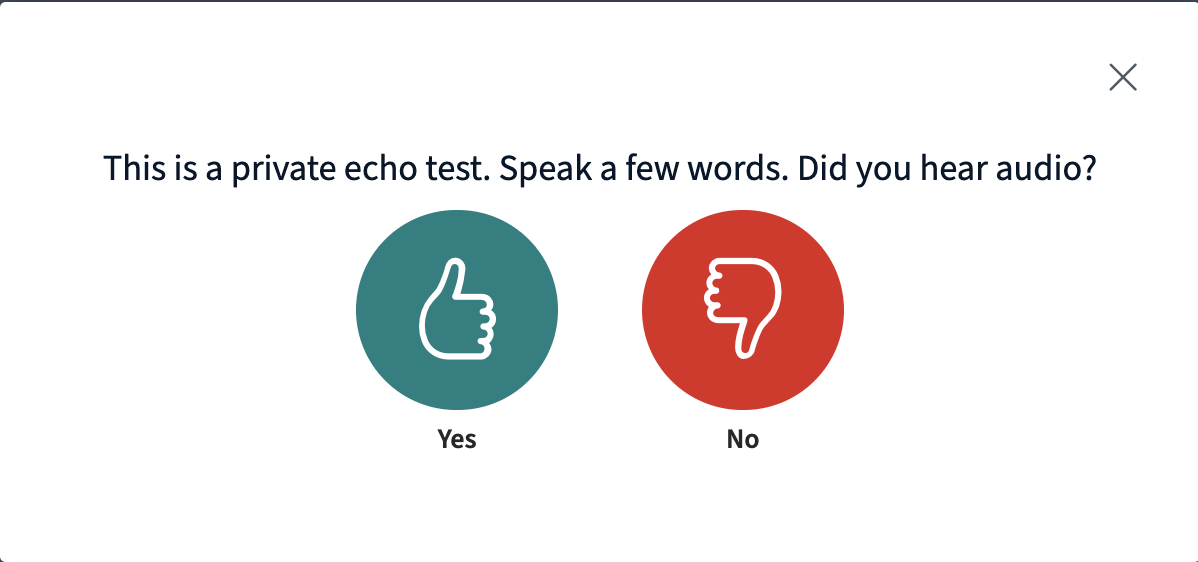
As soon as the user confirms that he has heard himself, the echo test and all further preparations are completed and he is forwarded to the video call.
Interface
The surface of a video call is divided into several areas. These can differ slightly depending on whether you are participating in a video call as a user or a participant.
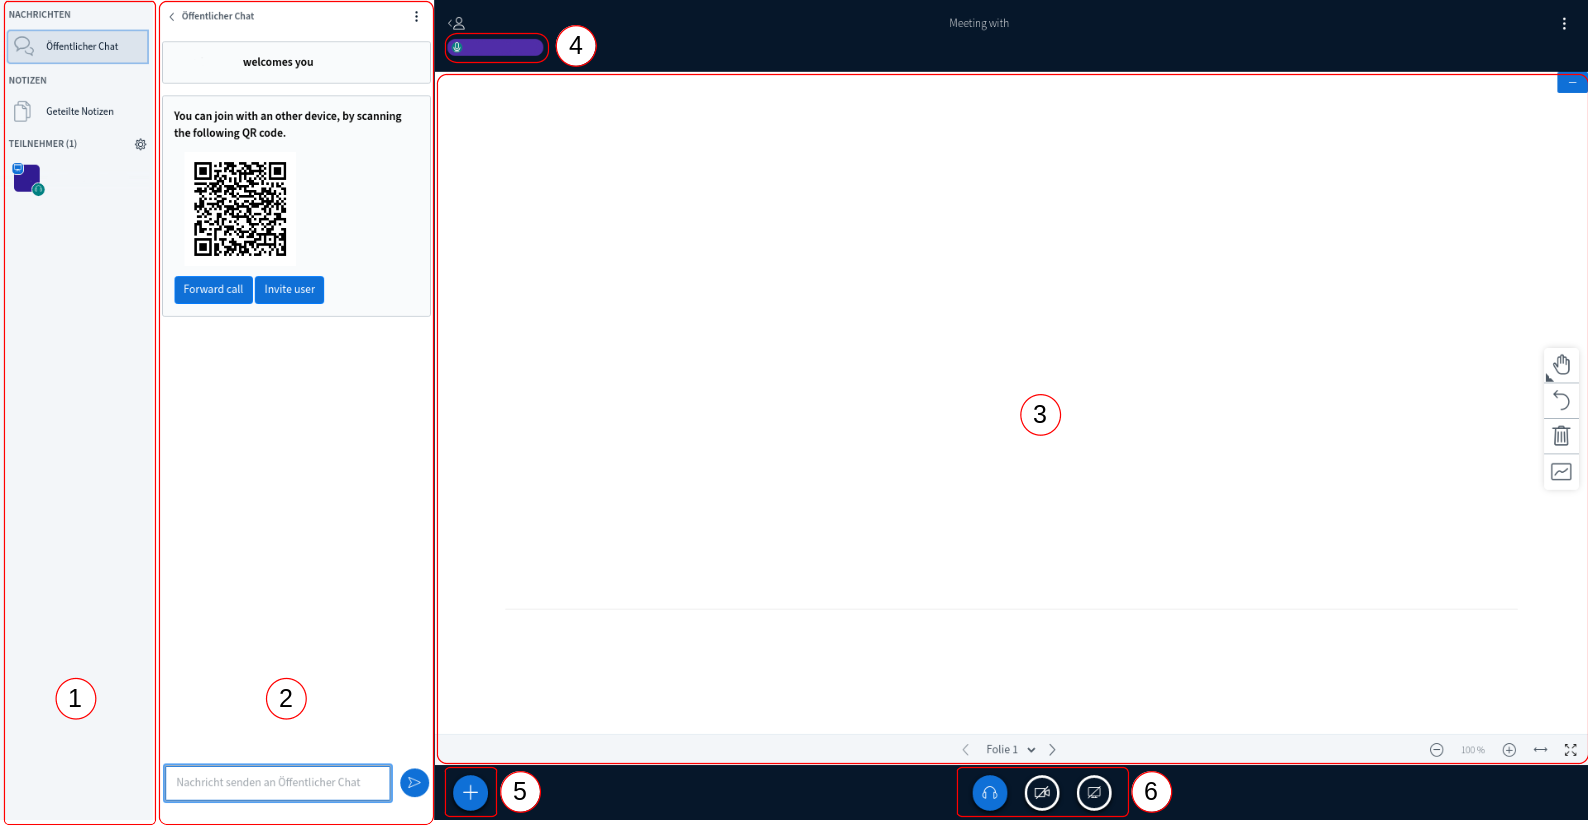
The surface is divided into different areas.
1 |
Userlist |
Shows the users present in the video call including their status. |
2 |
Chatwindow |
A text-based chat between all participants in the video call. The user also receives a QR code here, which he can use to e.g. log in with a second device, e.g. to use the mobile phone for a live presentation. |
3 |
Presentation |
In this area the presentation set by the user is shown. Various functions such as scrolling and zooming are possible in this area. |
4 |
Talk indicator |
This symbol shows who is currently speaking. |
5 |
Actionmenu |
Menu around e.g. include another presentation in the video call. |
6 |
Call control |
Various options for call control are available in this menu. |
Userlist
All attendees present in the video call are displayed in the user list. Furthermore, the status of their participation is shown for all persons by a small icon next to the name.
User |
The User is symbolized by a square icon. |
|
Participant |
The participant is symbolized by a round icon. |
The current telephony status of each user is also displayed. The small, green icon in the bottom right corner of the user is used for this.
no Icon |
The participant cannot hear other participants and has not activated a microphone himself |
|
Headphones |
The participant can hear the conversation, but cannot participate in the conversation. |
|
Microphone |
The participant can hear other participants and can speak to other participants himself. |
|
Microphone, disabled |
The participant can hear other participants and can speak to other participants himself, but is temporarily muted. |
Chatwindow
The chat window is identical for all attendees in the video call and is used for non-verbal communication between the user and the participant. In this case, it should be particularly emphasized that the user is shown a QR code. If he uses e.g. photographed on a mobile phone or tablet, he can also take part in the video call with this device. This means that a phone or tablet can be used to e.g. perform a live presentation directly on the desired object.
In addition to the QR Code there are two further functions

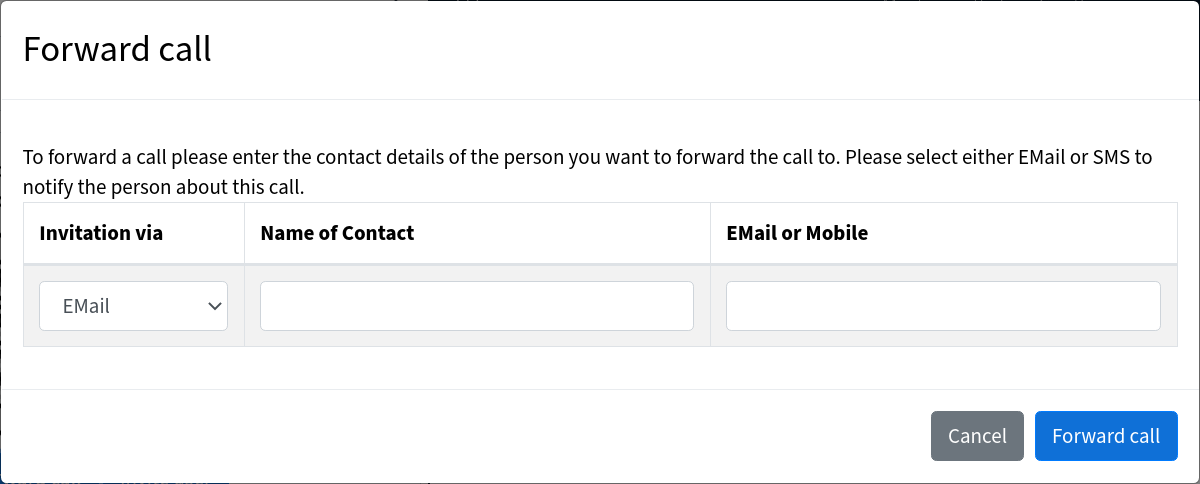
Forward Call If the user wants to transfer a call with a participant to another user, this can be done by clicking the button “Forward call” is done. Via the upcoming mask you can send an email or a phone number for SMS specify. If another participant is invited via this function, he/she will receive moderation rights as soon as he/she enters.
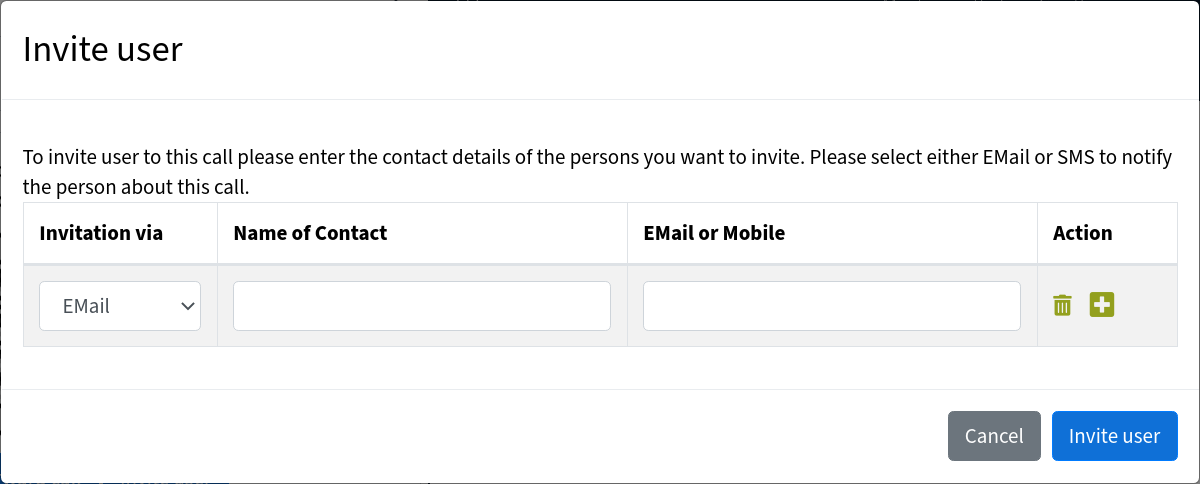
Invite user If the user would like to invite another participant to the call, this can be done by clicking on the “Invite user” button happen. With the upcoming mask you can enter an email or a phone number for sending SMS. If another participant is invited via this function, he/she will not receive special moderation rights.
Presentation
In this area, the user can show various presentations, e.g. be displayed as PDF or as PowerPoint slides. Furthermore, the playback of videos e.g. from youtube possible. All actions in this area, such as scrolling through the presentation is carried out synchronously for all attendees in a video call.
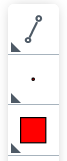
The presentation area can also be used as a whiteboard. The user has the option of using various tools from the toolbar to emphasize certain points in a presentation or to sketch something on a white surface.

The following functions are available in detail:
Text
Line
Circle
Triangle
Rectangle
Freehand
Move
Any number of notes and / or notes can be written into the presentation using these. Color and line width can also be defined after selecting the tool.
Actionmenu
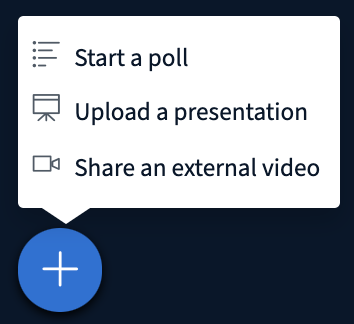
The user can carry out various actions in the action menu. The two most important functions here are the integration of an external video e.g. from Youtube as well as the integration of one or more presentations in the current video call.
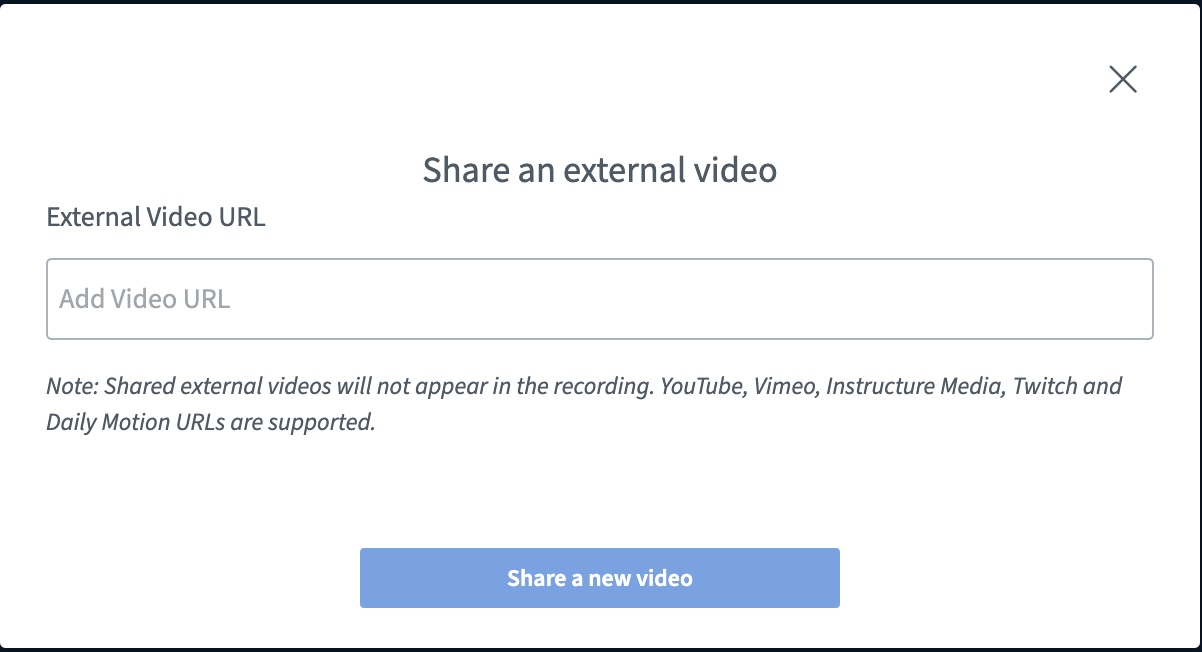
In the mask for integrating an external video, only the address of the video, for example on Youtube, is required. The system pulls all other information automatically and then starts playing the video.

Different formats can be used as a presentation for the video call. Normal text files, Microsoft PowerPoint and Word as well as photos and PDF files are supported. A PDF file in landscape format is recommended for optimal display.
In the upload window, the desired presentation can either be dragged and dropped onto the dashed field or alternatively selected using a file browser. The file is then placed in a queue and can be uploaded to the system and converted by pressing “Upload” so that it can be displayed on all end devices.
After a presentation has been loaded into the system, the user can perform further actions on this presentation. These include:

|
Presentation can be downloaded by the participants. |

|
Make presentation the current active presentation. |

|
Delete presentation. |
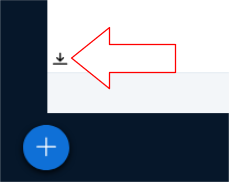
If a presentation is released for download by a moderator, the following appears in the lower left corner of the presentation area an additional icon that all participants can use to download the presentation.
Call control
The general functions of the video call are displayed and managed here. With this function field, the following options can be controlled within a video call:
Mute/Unmute microphone
Enable/Disable audio
Enable/Disable camera
Enable/Disable screen sharing (user only)
The microphone can be used to temporarily mute or unmute the microphone.
With the function “turn off audio” you can turn off all audio traffic. The participant then only sees the presentation and the chat. The switch-off can also be canceled again using the same button, or should it have been deactivated at the beginning of the video call audio, also activate it initially. The same steps are followed as described under Vorbereitung.
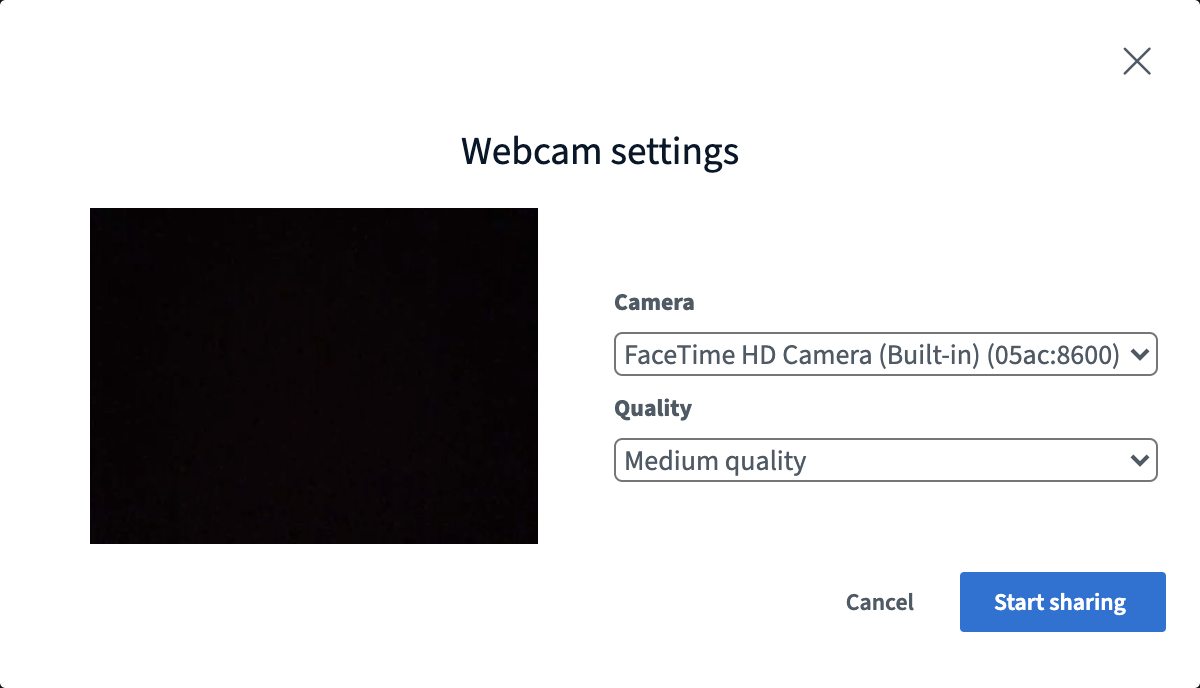
The camera symbol gives you the option of transmitting a live image using an integrated camera or a camera connected via USB. This picture is visible to everyone in the video call. The transmission of the webcam cannot be controlled individually to individual participants.
As soon as the camera icon is clicked, the browser will ask for the necessary authorization - as with the microphone or audio settings. Furthermore, the video call must be used to set the quality with which the image should be transmitted.
With the “Screen sharing” function, either a selected program, a part or the entire screen of the user is transmitted to the other attendees. This enables users to directly understand functions from other applications on the screen of the user. This function also requires the browser’s approval in advance.
Hint
Confidential information such as passwords, internal links or applications should be closed before the screenshare.
Leave call
The video call can be ended via the menu in the upper right corner of the presentation window. The user must always leave the call at this point using the “End conference” function so that the call is ended safely. Participants can simply close the browser window or use the “Exit” function from the same menu.